


We’ve all been there: losing work to an accidental overwrite. A novel chapter gone because you hit save at the wrong moment. A thesis section, hours of work, now missing. Windows has a tool, though, that can save us in this sort of situation, but it’s just not turned on by default.
The tool is called File History, and it’s been part of Microsoft’s OS since Windows 8. It keeps rolling timestamped copies of your files on an external drive so you can roll back to earlier versions if something goes sideways. Similar to Apple’s Time Machine, it just keeps you backed up and ready to restore without any input on your end. The catch is that it ships off by default, and Microsoft has put it inot the legacy section of Windows 11, so most of us don’t even think to look for it.
Related
I ditched Windows Storage Sense for this single-line fix and reclaimed space I didn’t know I had
One DISM command freed space Storage Sense missed
What File History actually does
It keeps versions, not just backups
There’s a big difference between a backup and a version history. A backup will save a snapshot of your files at one moment in time. FIle History saves many snapshots at regular intervals so you can go back to a version from an hour ago as easily as a version from a week ago to see exactly what your file was like back then.
With the default settings, File History backs up your Desktop, Documents, Pictures, Music, Videos, and offline OneDrive files, saving a new version every hour. The copies get stored on whichever external drive or network location you point File HIstory at, and Windows keeps adding to them over time.
When you need to go back, search for “Restore your files with File History” from the Start menu. You’ll get a timeline of everything the tool has saved and can navigate back through versions with the arrow buttons, preview the file, and hit Restore.
File History is not a full system backup; it won’t save your OS, installed apps, or driers. It’s made specifically for your personal files only.
Why Microsoft buried it
It’s “legacy” now, but it still works
Windows Backup option in SettingsCredit: Kanika Gogia / MUO
In Windows 11, Microsoft officially classifies File History as a legacy feature, like Backup and Restore from Windows 7 and Internet Explorer mode. The Settings app won’t link to File History directly, and you’ll have to find it in Control Panel under System and Security. Microsoft has a newer tool, called Windows Backup, which routes your backup files to OneDrive instead of a local external drive.
That works, of course, but it requires a Microsoft account and eats into your OneDrive storage quota. File History, on the other hand, works entirely offline, keeps your files under your control, and doesn’t need a cloud subscription.
Just because File History is a “legacy app” doesn’t mean it’s going away anytime soon; it still works on Windows 11 (and Windows 10). Legacy just means that Microsoft isn’t actively developing it. For a local, offline version of your personal files, though, it remains one of the most useful things on Windows, in my opinion.
How to turn it on
You need an external drive first
Grab an external drive and connect it to your PC with USB. Make sure it has enough room on it to hold your files several times over, since File History will accumulate versions. The bigger the drive, the further back you can go. Since 1 TB drives are fairly inexpensive these days, it’s well worth it for something like this.
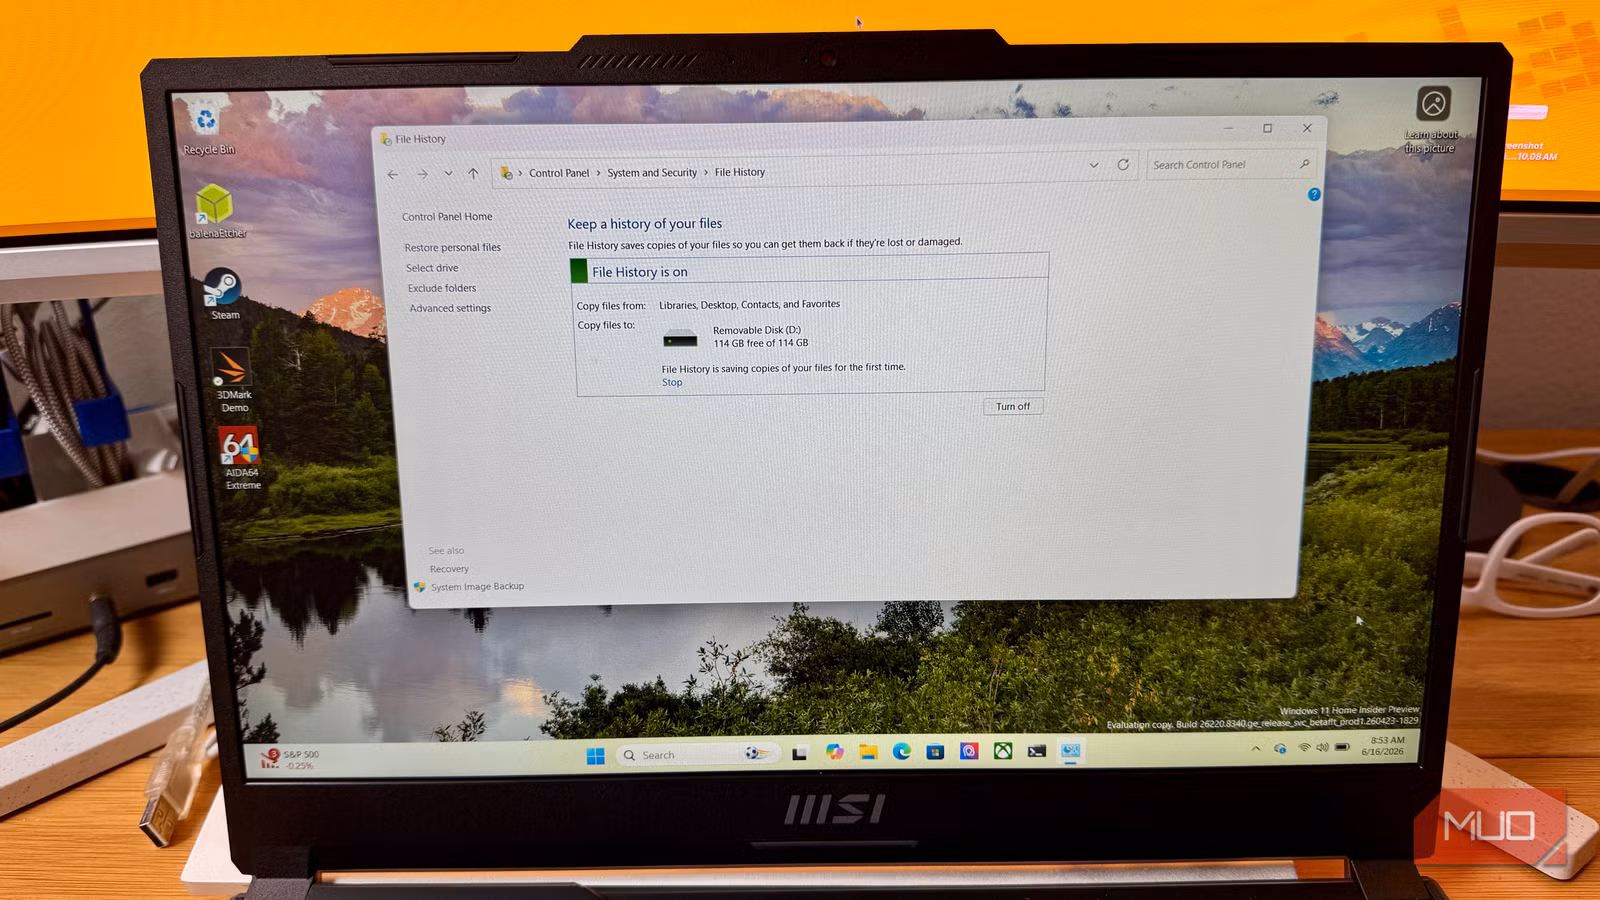
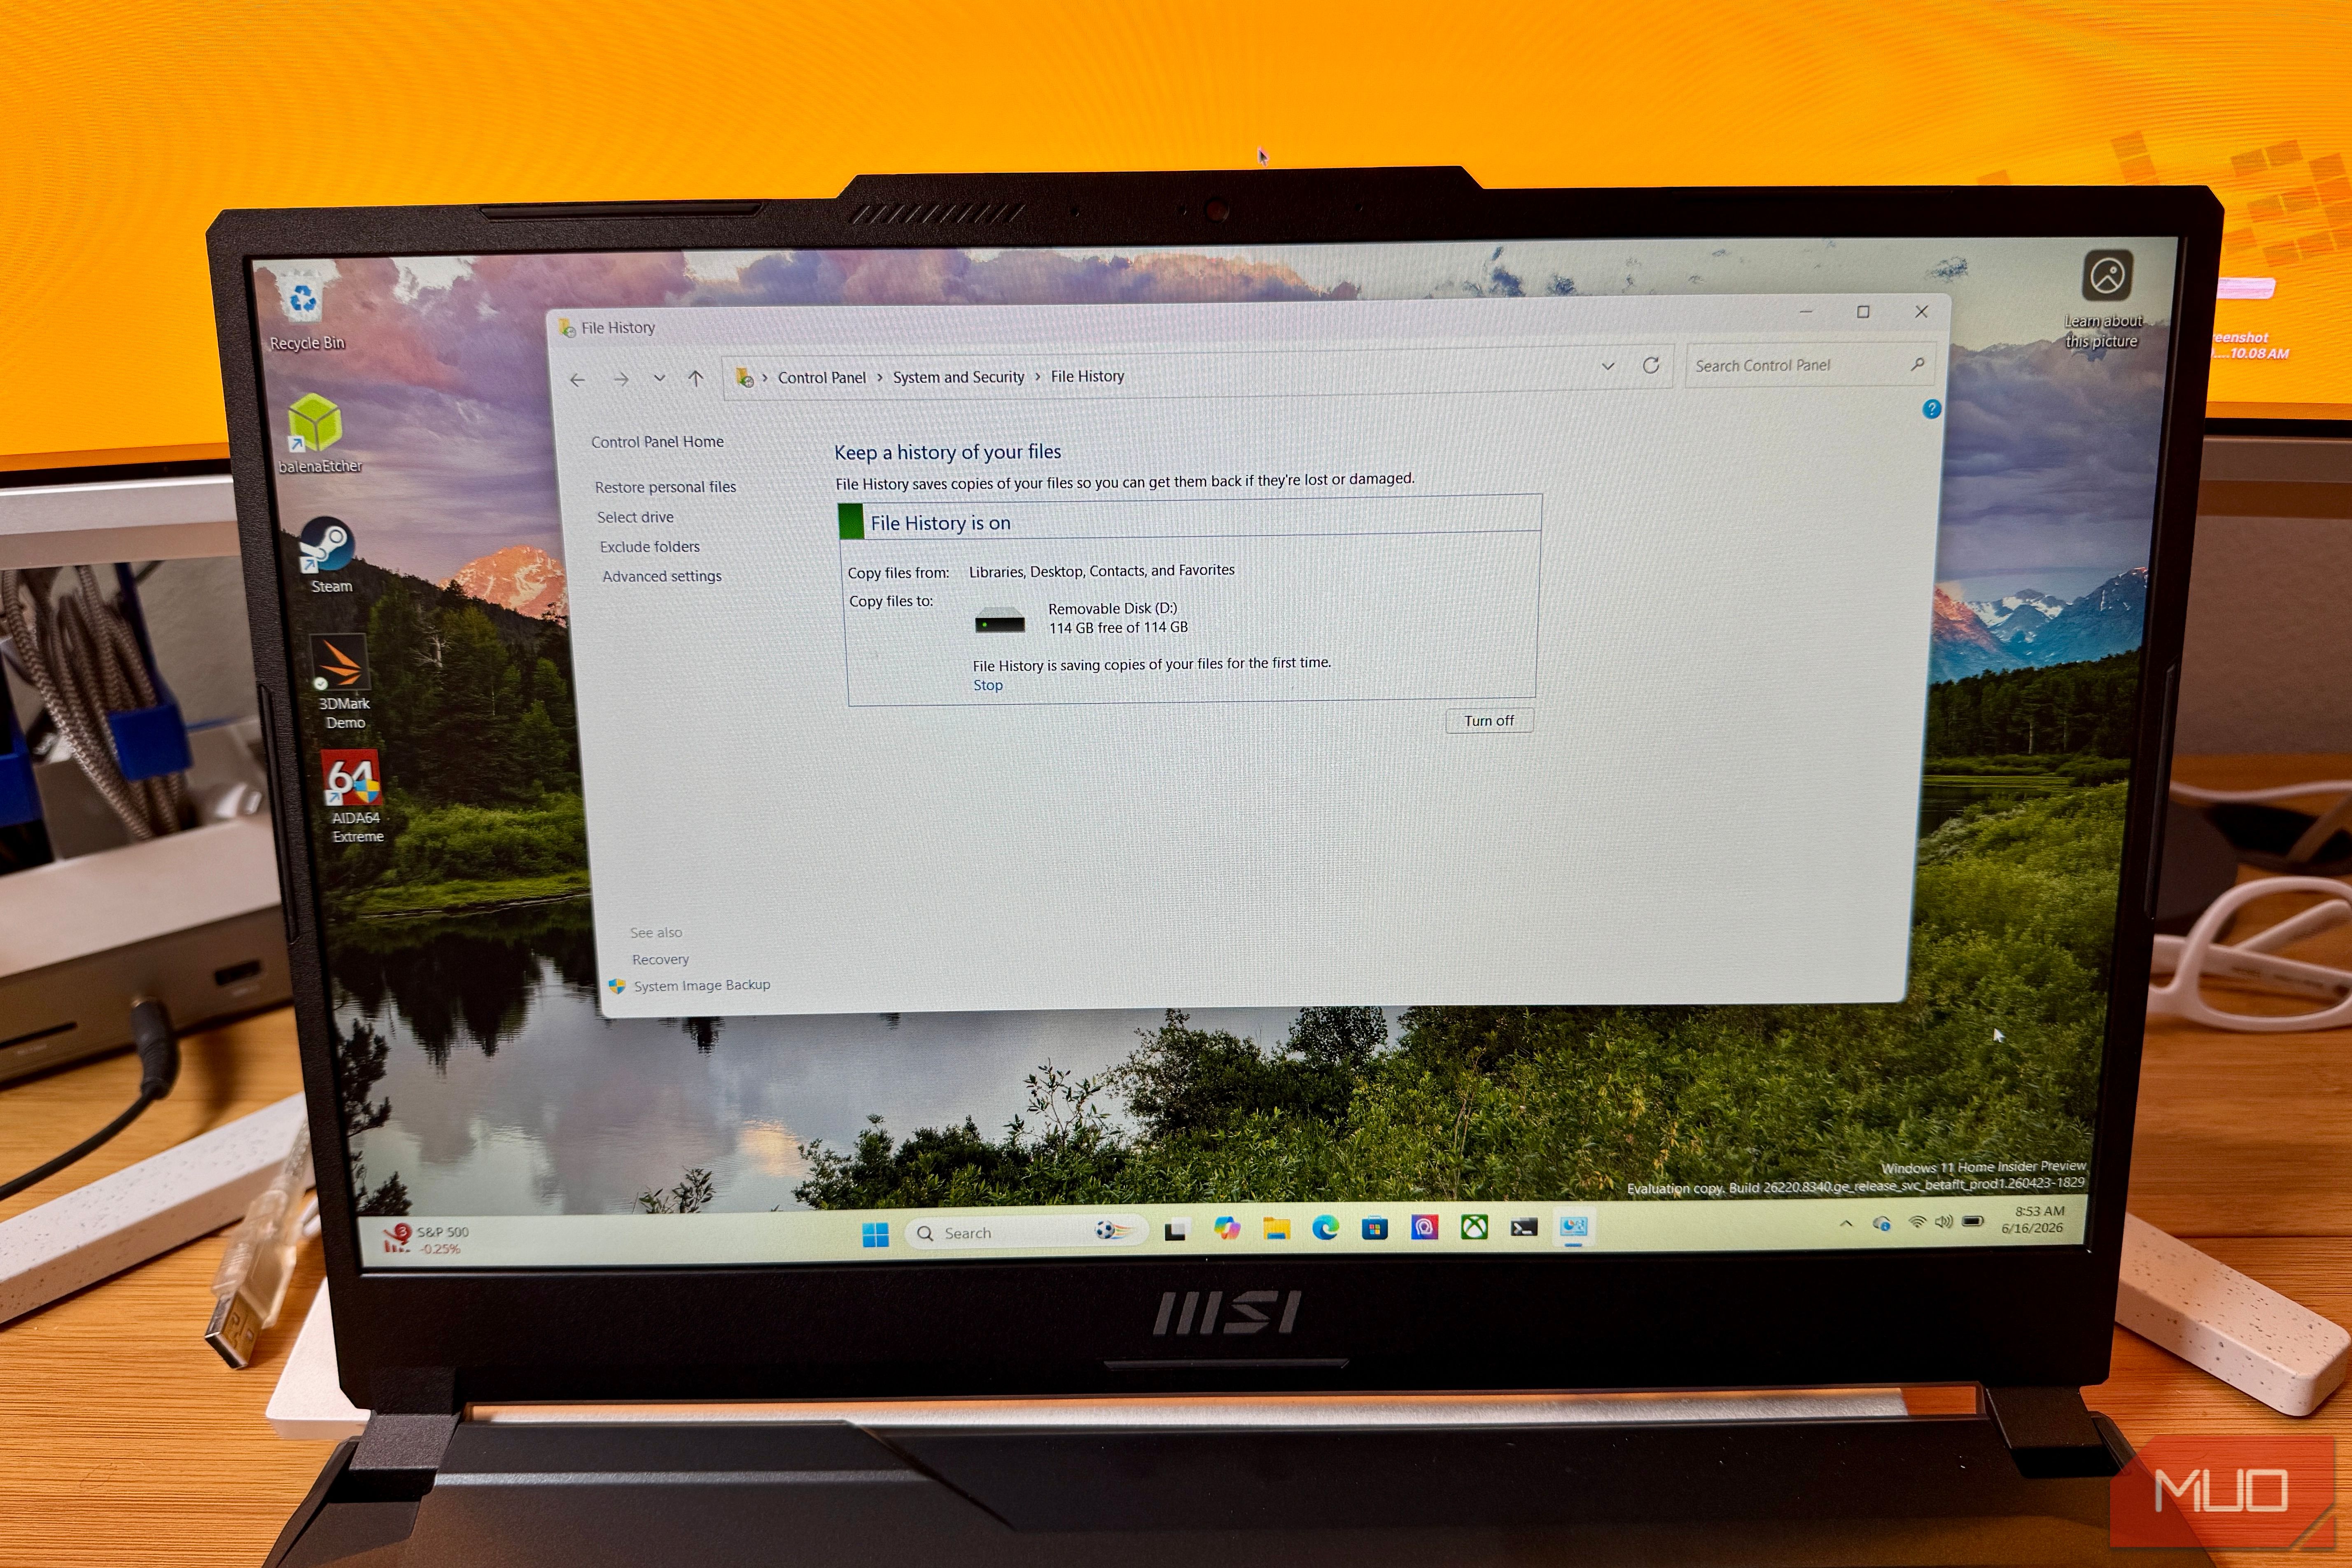
Once you connect the drive, open Control Panel (you can search for it in the Start menu) and navigate to System and Security. Click FIle History and if Windows detects your external drive, it will show it as the target. Click Turn on, and you’re done. File History is now running.
You can of course adjust the settings by clicking Advanced settings on the left panel, and change how often it saves copies. The default is every our, but you can make it save versions every 10 minutes. You can also adjust how long it keeps versions, which defaults to “forever,” or until your drive runs out of space. You can also add folders to the backup by including them in a Windows Library with a right-click in File Explorer. Choose Include in library, and pick a library. File History will then grab it on its next run.
Capacity
2TB
Power
USB 3.0
Speed
120MB/s
Connection
USB
Portable
Yes
Brand
Seagate
When version history saves the day
The cases where this matters most
The most obvious use case here is when you accidentally overwrite a file. Imagine editing a chapter of your novel, saving it, then closing your laptop to go make dinner. Coming back the next day, you notice that your edit wasn’t that great, and you overwrote the better version. If you have File History on, you can just open the File History browser (“Restore your files with File History” in the Start menu), scroll back to the previous version, and restore the earlier version.
It’s also great to compare versions when doing creative work. I’ve wanted to pull a paragraph from an earlier draft of an article to use in the current one more than once. Without version history, that paragraph is gone. With it, though, i can browse back and copy it from an older version without messing with the current file or messy version histories.
Sure, emptying the Recycle Bin doesn’t actually delete your files in the sense that the data sticks around on disk until it’s overwritten. But that can be a messy recovery process. File History gives you a clean, intentional fallback that doesn’t require data recovery software.
Plus, if you’ve ever used Windows’ auto-cleanup tools and their default settings, you know Windows is not always looking out for your files the way you’d hope. File History is a much better solution.
Set it and forget it
File History runs on its own in the background, and needs no input from you to keep your files safe. Once it’s on and pointed at a drive, you don’t think about it again until you need it. At that point, you’ll be very glad you did.


